I love you ice cream, ice cream. I love ice cream. Ice cream, I love you. Yes, I do. Chocolate, cherries, bananas and berries. Honey baby, I love you.
– The Calendar Song, Busy Beavers
The above quote is taken from one of the ESL songs I use frequently in my classroom. This rather addicting song teaches days of the week and months of the year and is hugely popular with my students. It’s a dividing point amongst many of my teacher friends here with some, like me, who love the song and others who absolutely hate it. Either way, it’s an appropriate quote for today’s recipe. I have only made this recipe once but it is super easy and just so good that I am super excited to share it with you! My friends who tried it all really liked it and some even went back for fourths. Be warned though, if you don’t like bananas, this recipe is not for you as they are included in each layer, except the biscuit base. So look away now! However, banana lovers, read on!
A couple of months ago, I had a friend staying with me and over the course of that weekend we cooked up a storm. One of things that we made was Healthy Recipe Ecstasy’s dairy-free, gluten-free caramel sauce*. It was really good and I have been playing around with ways of incorporating it into different dessert recipes. Finally, thanks to a craving for Banoffee Pie and an already deep-seated love of ice cream, the idea of using the caramel in a Banoffee inspired ice cream cake began to take hold.
Instead of worrying too much about making replica of Banoffee Pie in the form of an ice cream cake, I decided to concentrate on the elements of the pie that I like most: Caramel and Bananas. I spent a couple of bus rides deciding what ice cream flavour, and other elements I could incorporate into the dish and what really complements bananas and caramel. Coconut was an obvious choice, not least because it is a key ingredient in the caramel but also because whenever I make a banana smoothie I always add some coconut. I chose the vanilla ice cream as I thought it would be a good substitute for the cream of Banoffee pie. The chocolate ice cream was another natural pairing as I think rich chocolate, bananas and coconut were made for each other. They were, right?
Although I didn’t make this recipe with The Jam, it is one that kids would probably love to be involved in, although not getting to eat it straight away may take away some of their enjoyment of the process!
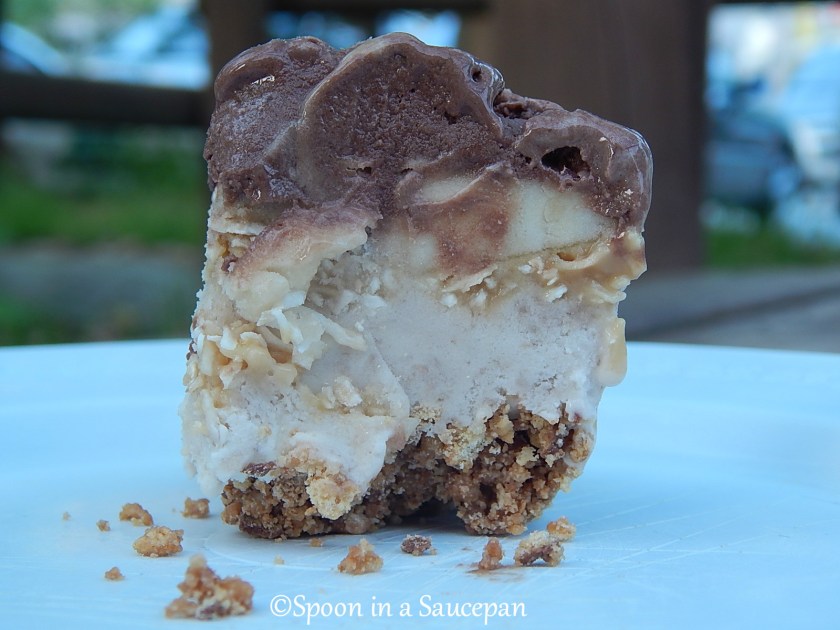
Banana and Coconut Ice Cream Cake
Serves around 15
Ingredients
- approximately 5 tbsp melted butter
- 1¼ cup chocolate digestive biscuits,* crushed
- 900 ml vanilla ice-cream
- 7-8 bananas
- 2 tbsp coconut butter (I use Artisana coconut butter)**
- Healthy Recipe Ecstasy’s Dairy Free, Gluten Free Caramel Sauce***
- I used one 560ml tin of coconut cream (should yield a little over a cup of coconut fat)
- ¹⁄3 – ½ cup, brown sugar
- ¼ cup maple syrup
- ½ tbsp vanilla extract
- pinch of salt
- 1 cup shredded coconut flakes, lightly toasted
- 600ml Chocolate Chip Chocolate Ice Cream
Method
- Lightly butter a baking tray, or a springform cake pan and set aside. I used an 11 x 7 x 1.5 inch tray.
- Mix the melted butter with the digestive biscuits, put into the baking tray or a springform cake pan and smooth out.
- Cover with cling film/plastic wrap and put into the freezer for around 1 hour.
- Leave the vanilla ice-cream out for around 20 minutes before you are going to use it, so that it softens enough to mix it up. Put the softened ice cream into a mixing bowl.
- While the ice cream is softening, using a hand blender, blend 3 of the bananas with the coconut butter.
- Once softened enough, mix in the banana coconut mixture.
- Remove the digestive biscuits from the freezer and spread the banana vanilla ice cream on the biscuits. Place back in the freezer for around 3 hours, covering with the cling film
- Meanwhile, prepare the caramel. Once all the ingredients were I added, I did let it simmer a little longer than 5 minutes (more like 10 to be honest) before setting it aside to cool down and slightly thicken up.
- Remove the ice cream cake from the freezer and pour the caramel on top. Sprinkle the toasted coconut all over the caramel and finally, top with 2-3 bananas cut into rounds.
- Place back in the freezer for about 3-4 hours, covered, checking occasionally to make sure that the ice cream cake is firming up. You can leave the cake in the freezer for longer if needed.
- Lastly, let the chocolate chip chocolate ice cream soften up for around 20 minutes.
- In the meantime, blend together 2 bananas and add to the chocolate ice cream once it’s softened.
- Remove the ice cream cake from the freezer, and top with this final layer.
- Place back in the freezer for a minimum of 2 hours, but longer would be preferable.
- Remove from the freezer about 10 to 15 minutes before you are ready to serve and enjoy! Happy Spring!
*You can substitute graham crackers for digestive biscuits.
**I love this coconut butter and if you can’t get it in the store, I suggest ordering it on iHerb. If you order it on iHerb, you can use my discount ( RRJ170) to get $10 off your first order. Living in Korea, iHerb is a must use website to get all those hard to find ingredients, particularly for baking. I will also continue to use it when I am home as they have a lot of great products.
*The recipe for the vegan caramel sauce on Michelle’s blog is fantastic. However, due to what I had in my cupboard (I used up the last of vanilla extract) and the amount of coconut fat that was yielded from my tin of coconut cream, led me to adjust the amounts.
TIPS
Make it your own: When I make this again, I want to make some extra caramel to add to the chocolate ice cream layer. If you prefer you can use regular caramel, it doesn’t need to be dairy free. One of my friends suggested putting fresh banana slices on top of the chocolate ice cream when you serve it. I think this is an inspired idea that I want to do when I make it next time.
Make it easier: although I think that the caramel is a key ingredient, I understand if you don’t have time to make it, so you could use a store-bought caramel instead. If you live somewhere with access to a Tesco or Homeplus, I recommend the Tesco brand salted caramel.

Pingback: Oven Roasted Yogurt Chicken and Vegetable Curry | Spoon in a Saucepan
Wow! This looks incredibly delicious, Maggie. 🙂
Thanks a lot for stopping by my blog. Have a wonderful time. xx
You’re welcome and thank you! It was so good that I want to remake it soon!
Wow! That looks sinful!
Thank you! I really hope you like it! And thanks for letting me share the caramel!