Latest Posts

Spinach, Pumpkin Seed and Caprese Stuffed Chicken

“If God grants me longer life, I will see to it that no peasant in my kingdom will lack the means to have a chicken in the pot every Sunday.”

– Henri IV of France

DSCN1473First off, hello everyone! It has been a while since I posted a new recipe. May has been an intense month – the first 3 days were spent at Gujora Beach on Geoje Island (see right). It was just beautiful there and so much fun, too! Around 11 of us went, and we barbecued tons of food: hamburgers, chicken, pork, and vegetables for nearly every meal. The following weekend I celebrated a friend’s birthday in Seoul, and since then I’ve just been trying to catch up on normal everyday life while trying to perfect the following recipe. Which I did, finally, on Saturday morning!

Over the last month, I think I’ve had various versions of this recipe about 6 times, and I am at the point where I am almost sick of chicken (but  can one ever, really, be sick of chicken?). Luckily, I have plenty of taste testers in my group of friends, and one of them in particular was really helpful in deciding the final ingredients. He has tasted three different versions, and it was his inspired suggestion that lead me to include tomatoes. So, thank you, Luke 1.0!

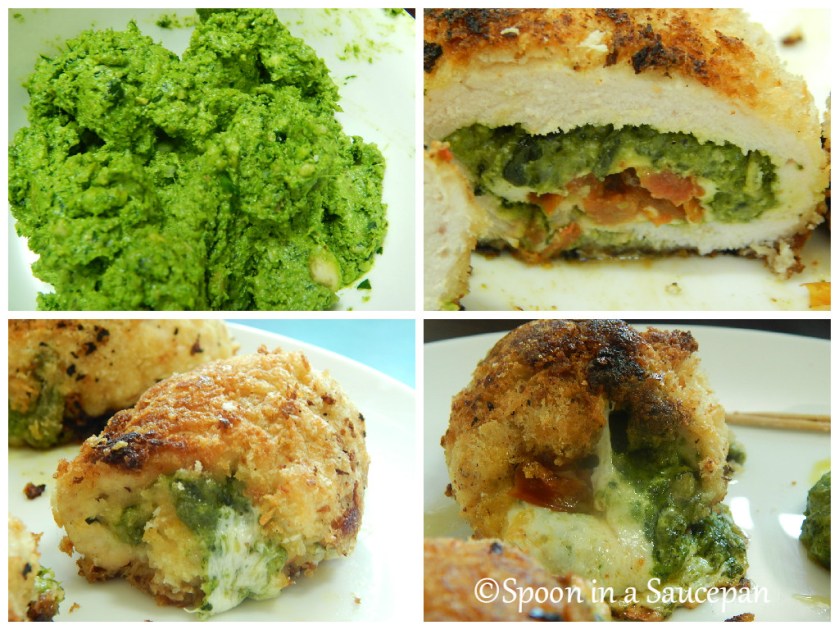
This recipe, for as long as it took me to get just right, is a relatively easy one to make. The “pesto” is the hardest amount of work, and all you are doing is blitzing the ingredients with a hand-blender! I really like how crispy the chicken gets and how well the mozzarella and tomatoes go with the pesto. I had wanted to incorporate spinach and pumpkin seeds into a stuffed chicken recipe for a while, and I think that it works perfectly with the basil pesto as it not only brightens the colour of the pesto, but also adds texture and richness. Additionally, the spinach gives you a little iron, and the pumpkin seeds some zinc. (According to the World’s Healthiest Foods website zinc is incredibly important for our immune systems. As someone who has a terrible one, this is really important for me.)

I hope you like this recipe and it becomes a regular in your repertoire of dishes!

Spinach, Pumpkin Seed and Caprese Stuffed Chicken

Serves 4-6

Ingredients

  • 1 tbsp green pesto
  • ½ cup spinach, washed and excess water spun out
  • 2 garlic cloves, whole
  • ¼ cup pumpkin seeds
  • ½ cup mozzarella, diced*
  • 1 cup flour, seasoned with salt and pepper
  • 1 egg, beaten
  • Salt and pepper, to taste
  • 1/4 cup freshly grated parmesan
  • Salt and pepper for seasoning
  • 1 cup breadcrumbs**
  • 4 Chicken breasts
  • 8 thin slices buffalo mozzarella cheese
  • 1/3-½ cup of sundried tomatoes in oil*
  • 2-4 tbsp olive oil

Method

  1. Preheat the oven to 200°C.
  2. Meanwhile, using a blender (I used a hand blender), blend together the pesto, spinach and garlic cloves.
  3. Add the pumpkin seeds, the hard mozzarella cheese and seasoning. Blitz until most of the pumpkin seeds are ground up and the cheese has mostly blended with the other ingredients (it kind of looks like a pesto without the oil).
  4. Place the flour with a little salt and pepper in a shallow bowl or on a plate and set aside.
  5. Place the egg in a separate shallow bowl and set aside.
  6. Mix the parmesan, salt and pepper into the breadcrumbs in a shallow bowl and set aside.
  7. Cut each chicken breast in half through the middle so that you have two thinner pieces (almost as if you are going to butterfly the chicken, but instead cut the whole way through).
  8. Flatten each half out with a meat mallet or rolling pin.
  9. Spread some pesto on each piece and top with a slice of buffalo mozzarella.
  10. Add some of the sundried tomatoes to the top of the mozzarella.
  11. Roll the chicken to encompass the filling and secure with a toothpick , if needed.
  12. Cover the stuffed chicken with the flour, shaking off any excess flour.
  13. Then dip and cover in the egg, and finally, the breadcrumb mixture.
  14. Meanwhile, heat 2 tbsp of olive oil over medium/medium-high heat.
  15. Add the chicken breasts and fry until golden on each side. If needed, add more olive oil.
  16. Place each breast, seam side down in a baking dish, and pop in the oven for 20-25 minutes, checking at the 20 minute mark.
  17. Serve with bread, potatoes, a pasta dish, a green salad, or vegetables. Guacamole goes really well as a side to this chicken also.

*I used the “Kirkland Organic Oven Dried Roma Tomatoes” that I found at Costco but sundried tomatoes in oil should work just as well. Depending on how big your chicken pieces are you may need a little more of the tomatoes. If you have any leftover, you can serve them as a side to the dish.

**I used Ottogi breadcrumbs but Panko would also work.

Tips

Make it your own: Add more garlic to the “pesto.” Substitute fresh tomatoes for the sundried ones or these balsamic roasted tomatoes.

In my (Korean) Kitchen – May 2015

“In My Kitchen” is a wonderful blog series by Celia of Fig Jam and Lime Cordial that provides glimpses into other bloggers kitchens. I’ve been creeping around looking at all the gorgeous kitchens for a few months and it’s really interesting to see what other people have in their kitchen and what they have been cooking. It’s a great way to be introduced to new blogs, new recipes and a great community. Thank you so much, Celia, for the opportunity! I hope you like this post and I can do another one next time. It was a lot of fun looking around my kitchen (in Korea) and seeing how to incorporate my bits and bobs.

In my kitchen are these handmade plates that my school gave me. I’ve been using them the last couple of blog posts. Originally, I wasn’t going to keep them when I moved home but I’ve grown incredibly attached to them, so now I’m not so sure that they won’t sneak into my suitcase!

schoolplates

In my kitchen, is this wonderful focaccia bread that I picked up in Seoul yesterday. My friends and I went to the restaurant that had a bakery attached to it. All the breads were amazing and it took  a lot of willpower to not buy everything in sight!

foccia

During the week, I went to Costco with one of my friends and I picked up some avocados. I only have one remaining and it’s earmarked for some guacamole I am making for lunch.

avocado

Korea is all about the cuteness from couple shirts to cute socks to stationery covered in gorgeous patterns.  In my kitchen, I have these adorable snail magnets I bought my first year in Korea at Art Box.

magnets

And that’s my kitchen. Please, make sure you check out the rest of the fantastic blogs in this series.

Banana and Coconut Ice Cream Cake

I love you ice cream, ice cream. I love ice cream. Ice cream, I love you. Yes, I do. Chocolate,  cherries, bananas and berries. Honey baby, I love you.

 – The Calendar Song, Busy Beavers

The above quote is taken from one of the ESL songs I use frequently in my classroom. This rather addicting song teaches days of the week and months of the year and is hugely popular with my students. It’s a dividing point amongst many of my teacher friends here with some, like me, who love the song and others who absolutely hate it. Either way, it’s an appropriate quote for today’s recipe. I have only made this recipe once but it is super easy and just so good that I am super excited to share it with you! My friends who tried it all really liked it and some even went back for fourths. Be warned though, if you don’t like bananas, this recipe is not for you as they are included in each layer, except the biscuit base. So look away now! However, banana lovers, read on!

A couple of months ago, I had a friend staying with me and over the course of that weekend we cooked up a storm. One of things that we made was Healthy Recipe Ecstasy’s dairy-free, gluten-free caramel sauce*. It was really good and I have been playing around with ways of incorporating it into different dessert recipes. Finally, thanks to a craving for Banoffee Pie and an already deep-seated love of ice cream, the idea of using the caramel in a Banoffee inspired ice cream cake began to take hold.

Instead of worrying too much about making replica of Banoffee Pie in the form of an ice cream cake, I decided to concentrate on the elements of the pie that I like most: Caramel and Bananas. I spent a couple of bus rides deciding what ice cream flavour, and other elements I could incorporate into the dish and what really complements bananas and caramel. Coconut was an obvious choice, not least because it is a key ingredient in the caramel but also because whenever I make a banana smoothie I always add some coconut.  I chose the vanilla ice cream as I thought it would be a good substitute for the cream of Banoffee pie. The chocolate ice cream was another natural pairing as I think rich chocolate, bananas and coconut were made for each other. They were, right?

Although I didn’t make this recipe with The Jam, it is one that kids would probably love to be involved in, although not getting to eat it straight away may take away some of their enjoyment of the process!

Banana and Coconut Ice Cream Cake

Serves around 15

Ingredients

  • approximately 5 tbsp melted butter
  • 1¼ cup chocolate digestive biscuits,* crushed
  • 900 ml vanilla ice-cream
  • 7-8 bananas
  • 2 tbsp coconut butter (I use Artisana coconut butter)**
  • Healthy Recipe Ecstasy’s Dairy Free, Gluten Free  Caramel Sauce***
    • I used one 560ml tin of coconut cream (should yield a little over a cup of coconut fat)
    • ¹⁄3 – ½ cup, brown sugar
    • ¼ cup maple syrup
    • ½ tbsp vanilla extract
    • pinch of salt
  • 1 cup shredded coconut flakes, lightly toasted
  • 600ml Chocolate Chip Chocolate Ice Cream

Method

  1. Lightly butter a baking tray, or a springform cake pan and set aside. I used an 11 x 7 x 1.5 inch tray.
  2. Mix the melted butter with the digestive biscuits, put into the baking tray or a springform cake pan and smooth out.
  3. Cover with cling film/plastic wrap and put into the freezer for around 1 hour.
  4. Leave the vanilla ice-cream out for around 20 minutes before you are going to use it, so that it softens enough to mix it up. Put the softened ice cream into a mixing bowl.
  5. While the ice cream is softening, using a hand blender, blend 3 of the bananas with the coconut butter.
  6. Once softened enough, mix in the banana coconut mixture.
  7. Remove the digestive biscuits from the freezer and spread the banana vanilla ice cream on the biscuits. Place back in the freezer for around 3 hours, covering with the cling film
  8. Meanwhile, prepare the caramel. Once all the ingredients were I added, I did let it simmer a little longer than 5 minutes (more like 10 to be honest) before setting it aside to cool down and slightly thicken up.
  9. Remove the ice cream cake from the freezer and pour the  caramel on top. Sprinkle the toasted coconut all over the caramel and finally, top with 2-3 bananas cut into rounds.
  10. Place back in the freezer for about 3-4 hours, covered, checking occasionally to make sure that the ice cream cake is firming up. You can leave the cake in the freezer for longer if needed.
  11. Lastly, let the chocolate chip chocolate ice cream soften up for around 20 minutes.
  12. In the meantime, blend together 2 bananas and add to the chocolate ice cream once it’s softened.
  13. Remove the ice cream cake from the freezer, and top with this final layer.
  14. Place back in the freezer for a minimum of 2 hours, but longer would be preferable.
  15. Remove from the freezer about 10 to 15 minutes before you are ready to serve and enjoy! Happy Spring!

*You can substitute graham crackers for digestive biscuits.

**I love this coconut butter and if you can’t get it in the store, I suggest ordering it on iHerb. If you order it on iHerb, you can use my discount ( RRJ170) to get $10 off your first order. Living in Korea, iHerb is a must use website to get all those hard to find ingredients, particularly for baking. I will also continue to use it when I am home as they have a lot of great products.

*The recipe for the vegan caramel sauce on Michelle’s blog is fantastic. However, due to what I had in my cupboard (I used up the last of vanilla extract) and the amount of coconut fat that was yielded from my tin of coconut cream, led me to adjust the amounts.

TIPS

Make it your own: When I make this again, I want to make some extra caramel to add to the chocolate ice cream layer. If you prefer you can use regular caramel, it doesn’t need to be dairy free. One of my friends suggested putting fresh banana slices on top of the chocolate ice cream when you serve it. I think this is an inspired idea that I want to do when I make it next time.

Make it easier although I think that the caramel is a key ingredient, I understand if you don’t have time to make it, so you could use a store-bought caramel instead. If you live somewhere with access to a Tesco or Homeplus, I recommend the Tesco brand salted caramel.

Ants on Logs: Apple, Celery and Cucumber – Cooking with Kids

“Cooking is at once child’s play and adult joy. And cooking done with care is an act of love.”

– Craig Claiborne

If you remember a few months ago, I posted a recipe I had made with a little friend of mine, The Jam. At that time we had made these Pizza Baguettes, and we had decided to work on our long distance relationship by cooking together as well as reading stories.

Well, since then, we’ve talked plenty and read plenty; but cooking is a little bit more of a feat than either his mom or I had originally contemplated. For one, we have to agree on a time and date that suits us both, and for two, I need to decide ahead of time what we are making, experiment by myself (if necessary), and then send the list of ingredients to The Jam’s mom. Consequently, we have only “cooked” together twice and both times we tried not only the traditional “Ants on a Log” snack but also different variations using different bases for the logs as well as different fillings.

This snack is a quintessential and perennial favourite of kids all over the place (adults, too, seem to have a lot of fond memories of this snack). It’s easy to make and, generally, one tends to have the ingredients on hand. When making these with The Jam, we used cucumber more often than celery as celery can be a little harder to come by here in Korea and, also, because The Jam really likes cucumber. He also really likes Ryvita crackers, so he used those along with cucumber the second time, we made them while I used celery and cucumber.

While I mostly led and told The Jam what to do and when, I also had him decide what he wanted to try. One of the memorable choices was cucumber with JUST honey (or in my case maple syrup). I have to admit it wasn’t MY favourite but The Jam seemed to like his just fine! According to The Jam, his favourites were the ones with cream cheese. I have to admit I am torn between the Apple Peanut Butter with Almonds, Walnuts & Chocolate (pictured below, top right) AND Cucumber Cream Cheese with Chorizo, Walnuts & Red Bell Peppers (pictured below, top left).

Younger kids, like The Jam, can help pick out their filling and favourite toppings. They may need some help spreading the peanut butter or cream cheese but should be okay sprinkling the various toppings on top of the filling. Older kids can learn how to wash and prepare the celery and, if using cucumber, to scoop out the seeds. Depending on the age of the child, you can teach them how to handle a knife correctly to slice the vegetables (and toppings). Lay the food out as follows, left to right: base, fillings, toppings.

The peanut butter versions, particularly with the dried fruit and nuts (no maple syrup or honey) can be made up ahead of time or used for school lunches. The cream cheese ones are best eaten right away. So, what are your favourites?

antsonlogs1

Ants on Logs: Apple, Celery, Cucumber

Ingredients

Logs

  • Celery, chopped into palm sized pieces
  • Cucumber, halved length wise, chopped into palm length pieces, scoop out seeds (& reserve the seeds)
  • Apples, sliced (remove seeds)

Fillings

  • peanut butter (crunchy or smooth)
  • plain cream cheese
  • cream cheese mashed with the cucumber seeds

Toppings

  • Chorizo, diced
  • Bell Peppers, diced
  • Nuts (walnuts, almonds, pecans, pistachios, cashews, etc)
  • Popcorn
  • Seeds (sunflower, sesame, pumpkin etc)
  • Apple, diced
  • Dried Fruit (raisins, cranberries, etc)
  • Honey, Maple Syrup
  • Dark chocolate (I used Lindt 90%, The Jam used Butlers)

Method

Celery/Cucumber/Apple and Peanut Butter

  1. Pick your base and fill with peanut butter.
  2. Top with any of the following ingredients.
    1. raisins/cranberries
    2. apples
    3. nuts
    4. seeds
    5. chocolate
    6. popcorn
    7. honey/maple syrup
  3. My favourite combination: Apple base with peanut butter, chocolate, almonds and walnuts

Celery/Cucumber and Plain Cream Cheese

  1. Pick your base and fill with cream cheese.
  2. Top as follows
    1. chorizo
    2. red bell peppers
    3. apples
    4. nuts
    5. raisins/cranberries
    6. honey/maple syrup
    7. seeds
    8. chocolate
  3. My favourite combination: Celery, cream cheese, apple, sesame seeds, walnuts

Celery/Cucumber and Cucumber Cream Cheese

  1. Pick your base and fill with cucumber cream cheese
  2. Top as follows
    1. chorizo
    2. red bell peppers
    3. apple
    4. nuts
    5. seeds
  3. My favourite combination: Cucumber with cucumber cream cheese, chorizo, walnuts and red bell peppers

This is part of my series: Cooking with Kids. If anyone would like to be a guest blogger in this series, please email me at spooninasaucepan@gmail.com

Chorizo and Feta Egg Muffins

“These eggs are broken. Cracked.”
“Yes, ma’am. That happens sometimes.”
“Does it?”
“Yes, it’s the unfortunate part of being an egg.”

– Peter Hedges

I don’t exactly remember the first time I had chorizo but I know it was after I finished college and moved back to Ireland. The way I remember it was that my friend, Alberto, invited me to join him at a Spanish dinner party that was held in one of the hotels in Temple Bar. For a nominal sum, you could drink as much wine and eat as much manchego cheese, crusty bread and cured meats as your heart desired. It was so much fun and I made a lot of friends through these dinners as well as discovering a lot about Spanish food and culture.

While I really like a lot of cured meats and, at home, would eat more than my fair share of them, since those dinners, chorizo has stood out for me as the best of the bunch. I love the dark red colour, the slightly spicy bite and how well it works in a variety of ways, on a piece of bread, on a pizza baguette or in these egg muffins!

Over the last eight weeks, ever since I went to Laos, I have had a litany of health problems: food poisoning, hyperactive gut and a horrid cold that was causing EVERYTHING except for oranges to taste like salt. This has been causing a serious dilemma – I haven’t been able to eat any exciting food or cook anything really appetising for weeks. Plain bread/toast and oranges is incredibly boring. I had been really looking forward to Easter and to a delicious brunch with my friends but when the day rolled around I was in the middle of my “everything tastes like salt” dilemma and my appetite was really poor. However, I couldn’t let the side down so I decided to suck it up which led me to making these egg muffins for the second time. (and demolishing a plate of incredible pancakes, biscuits & gravy, french toast casserole etc, etc). The first time I made them was with cheddar but a lucky chance remark from my cousin while she visited led me to substituting feta for the cheddar. The feta definitely adds another layer of Mediterranean sunshine to these savoury bites. The feta and the chorizo go so well together it’s hard to believe that they traditionally wouldn’t.

This Friday, after another week of fairly bland food and after finally mostly recovering from my cold, I decided I couldn’t take any more boring meals and I popped off to the big Home Plus (supermarket) on my way home to buy some chorizo and feta. When I got home I recreated the egg muffins I had made at Easter, tossing in some fresh coriander/cilantro  as well.  I really like the addition of aehobak which is a Korean vegetable that seems to be a cross between courgette and pumpkin.

These egg muffins last about 4 days if you can keep your hands off them and they work quite well for brunch gatherings or as a quick breakfast on the go. Additionally, you can serve them with a salad and some toast for a light dinner or lunch. You can easily double the recipe to make more or halve it to make less (that’s what I did when I made them this weekend). The recipe below made around 30 egg muffins.

Lastly, before I leave you to read the recipe, a huge shout-out and thank you to my friend, Adam, for creating a lovely logo for me! Thank you so much!

Spoon in a Saucepan Logo Final

fetachorizoegg2collage

Chorizo and Feta Egg Muffins

Makes around 30*

Ingredients

  • 2 tbsp olive oil
  • 1-2 tsp paprika
  • ¼ tsp chili flakes
  • 1 onion, diced
  • 1 red bell pepper, diced
  • 1 Korean 애호박 (aehobak) green pumpkin/ 1 small courgette/zucchini, diced.
  • 1 tsp dried coriander/cilantro
  • salt and pepper to taste
  • 14 large eggs
  • 150g feta, crumbled
  • 100g Spanish chorizo, thinly sliced and diced
  • 1 – 2 tbsp coriander, roughly torn
  • ¼ cup coconut milk

Method

  1. Preheat your oven to 175°Celsius. Place paper liners in each muffin cup (I only have one 6 cup muffin tin so I do everything in batches).
  2. Meanwhile, heat oil over medium-high heat. Once hot, add the paprika and chili flakes and cook for around 15 seconds.
  3. Add the onions, mixing well with the spices and let cook for 3-5 minutes. Stir once or twice.
  4. Add the dried coriander,  red bell pepper and aehobak and cook until everything is soft and the onions are lightly browned.
  5. Once cooked set aside to cool for a few minutes.
  6. Meanwhile, crack the eggs into a large bowl and scramble.
  7. Add the coconut milk, feta, fresh coriander and chorizo , mixing  thoroughly with the scrambled eggs.
  8. Add in the vegetables .
  9. Using a ladle, transfer some of the egg mix to each muffin cup, filing about half way to three quarters of the way. (My toaster oven is small so I can’t go above three-quarters of the way, and half way works best overall, so adjust accordingly.).
  10. Pop in the oven for 20 minutes or until firm in the centre. Remove from the oven and let stand for a minute or so. Then, using a butter knife go around the edge to pop out the muffin. Place on a cooling rack for a minute or two and then serve immediately. Alternatively, let cool completely before refrigerating for breakfasts.
  11. Repeat until the mixture is finished.

*As mentioned above I only fill between half way and three-quarters of the way so, with a conventional oven you would be able to make bigger muffins. Experiment and let me know how you get on!

TIPS

Vegetarian Option: Although these are called Chorizo and Feta Egg Muffins, you can leave the Chorizo out and they will still be delicious.  I have tried a few like that and I really liked it as well.

Make ahead:  You can make the veggie mix ahead of time. Also, as already mentioned you can make the egg muffins a few days in advance so if you are making a huge batch for a brunch you will have plenty of time to make them all!

Make it your own: Experiment with different vegetables and adjust seasoning to your own taste.