Latest Posts

Vegan Lentil and Sweet Potato Curry

If any dish deserves to be called global, it is curry. From Newfoundland to the Antarctic, from Beijing to Warsaw, there is scarcely a place where curries are not enjoyed.

Colleen Taylor Sen

Jump to Recipe

Curries are one of those things that are somewhat universal – I mean, different cultures in Asia have different types of curry: Thai Green or Red Curry, Japanese Katsu Curry and Curry Rice, both of which have been adapted into Korean culture, as well as of course Indian and Pakistani curries which I’m more familiar with. In Ireland, one of our favourite ways of having curry is on chips! It’s actually just a curry sauce but it’s amazing and will change your way of eating chips forever.

Anyway, this recipe came about when my sister was having her baby. As a result, we made her and her husband some meals to tide them over and make their lives a little easier. I had made a version of this once or twice before that but it wasn’t this definitive version nor had anyone else tried it at that point. Not only did my sister and her husband love it, but it was a hit with my Dad who generally doesn’t like anything I cook as it’s “too spicy”. His words, not mine. I wasn’t sure how he’d react as he’s not a fan of ginger or garlic. So the fact that he got seconds is the greatest compliment.

More fragrant than spicy, this curry is comforting, warming and moreish. It feels very autumnal with the sweet potatoes and seasonings, even though I actually made it in summer the first time I had it. The hardest part, or rather the most time-consuming, is preparing the spices. Grating ginger and turmeric takes a bit of time! You can use ground turmeric if you prefer. Therefore, I’ve included different options depending on what it is you have in your cupboard to try and make u your lives a bit easier. I tend to use bouillon cubes over homemade stocks, Oxo generally. However, I like this Delia recipe, and it’s not too difficult nor does it take much time. I sometimes make it in the morning before work and by the time I’ve gotten home, it has cooled and I can freeze it.

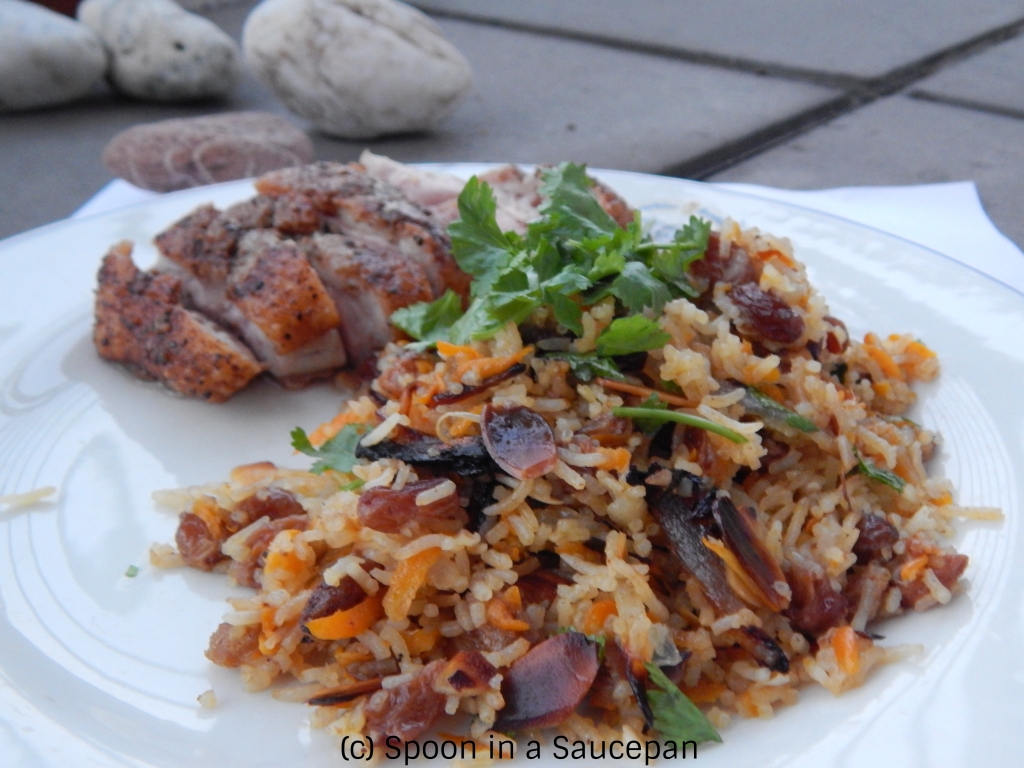
I’ve served it with the Carrot and Sultana Spiced Rice that I shared a few weeks ago for my housemate’s birthday. This rice, too, is quite a toothsome option as well.

Vegan Lentil and Sweet Potato Curry

Serves 6

Ingredients

  • Green or Brown Lentils, 225g – I use East End
  • 3 tbsp coconut oil or vegetable oil (not olive) or ghee, separated
  • 1 bay leaf
  • 4 cardamom pods, cut a small slit into each
  • 4-6 garlic cloves, crushed or minced
  • 2 tsp of freshly grated ginger
  • 1 tsp of freshly grated turmeric or 1/2 tsp ground turmeric*
  • 2 onions, one diced for the curry, the other sliced for later.
  • 1 tbsp hot curry powder
  • 1 tsp garam masala
  • 1 tsp cumin
  • freshly ground black pepper
  • 600g sweet potato, chopped into largish chunks. You don’t want them small as they will turn into mush (see photo)
  • 600-700ml vegetable stock
  • 1 tsp table salt
  • 400ml coconut milk, I use Chaokoh or Thai Gold
  • 250-400g frozen spinach*
  • Coriander

Method

  1. Put the lentils in a bowl and cover with water. Pick through, removing any that are shrivelled. Set aside to soak while you peel the sweet potatoes and place them in water. Then prepare the rest of the ingredients.
  2. When you are ready, put a large pot on the stove top on medium heat. Once hot, add 2 tbsp of the coconut oil.
  3. After 30 seconds, add the bay leaf, cardamom, garlic, ginger and, if you are using turmeric root, add that here, too.
  4. Sauté for one minute, stirring frequently to release the flavours.
  5. Stir in the diced onion and cook until they are translucent and soft. This takes between 5-10 minutes
  6. Add the curry, garam masala and cumin as well as some freshly ground black pepper. If you are using ground turmeric, add it now. Cook for another minute.
  7. In the meantime, drain and rinse the lentils. Add them to the pot, stirring to coat with all the spices and onions. Set a timer for 5 minutes and let them cook, stirring occasionally.
  8. After 5 minutes, add the sweet potato and cover, just barely with the vegetable stock. Give it a stir, top with a lid and turn the heat up to medium-high until it boils. Then reduce to low and leave it to simmer for 20 minutes.
  9. After 20 minutes, check to ensure the lentils are soft, add about a tsp of table salt and the coconut milk to the lentils, stirring it in. If the lentils aren’t soft, leave another 5 minutes before adding the coconut milk.
    1. If you are not freezing the curry, add frozen spinach at this time. Bring the heat back to medium- high and stir frequently for the next 10 or so minutes until the curry has thickened and the spinach has heated through and is no longer in blocks.
    2. If you are freezing and using frozen spinach, add the spinach only when reheating the curry and add about 50g per portion. Instead, stir in the coconut milk, bring back to medium and stir frequently for 10 minutes.
    3. If you are using fresh spinach, stir in the coconut milk and bring the temperature back up to medium-high. Stir frequently over the next ten minutes. Turn off the heat and add the fresh spinach.
  10. Once you’ve added the coconut milk, add the 1 tbsp of remaining coconut oil to a pre-heated frying pan over medium heat.
  11. Add the sliced onion and cook until well browned.
  12. Serve with rice or naan and top with coriander and the fried onions.

Tips

*If you want to stretch the curry add 400g, otherwise 250g is plenty.

For children or those not used to spicy dishes, like my dad, add yoghurt on the side.

If you are using the Carrot and Sultana Spiced Rice, I recommend choosing which dish to add the fried onions to but I personally prefer adding them to both.

Carrot and Sultana Spiced Rice

A single grain of rice can tip the scale. One man may be the difference between victory and defeat.

The Emperor, Mulan (1998)

JUMP TO RECIPE

This simple dish is one of those things I’ve been making for years. I learnt how to do something similar at the Oriental Cooking class I took in 2008 with my sister, Smyles. It was an amazing class and I learnt so much about cooking different Asian dishes, techniques, and how to use spices I’d never even heard of at that point. Our teacher was from Malaysia and she taught us so much and so well that there are different things Smyles and I still make, to this day, that she taught us.

The following recipe is kind of a mash up of different ones that she did with us, including a Saffron and Sultana rice that was incredibly tasty. I don’t have any saffron at the moment and I wanted to try something different in any case and this is the result. I personally think the fried onions and toasted almonds make all the difference and elevate this dish out of the stratosphere and towards the exosphere (which I learnt about today and it is the outermost layer of the earth’s atmosphere). Regarding stock or water, I really don’t mind which I use and choosing only water is usually an accident as I forgot to boil the kettle or I’d already poured it in before I realised my mistake. I’m only human!

Now, a funny story with a moral before we move on to the recipe. When I was toasting the almonds, on low under the grill/broiler, I had left the door open so I could keep an eye on them. However, I am short and, as I was stirring the onions, I knocked the door closed and didn’t realise for a few minutes. Well, as I pulled them out I could see it was quite bright inside – and, in fact, the greaseproof paper had caught on fire! Luckily, nothing was damaged, except the paper and most of almonds were just perfect. So, moral of the story – grow tall so you don’t accidentally bump your oven door closed or make sure you keep it open at all times!

I know you probably won’t believe it but except for the piece of paper and the dish, I did not organise the beautiful background. The plant was bought by my housemate and is flourishing beautifully because we left it alone, and the rocks must have been put down by her in that way because I haven’t been out on the balcony for a few days.

Lastly, the beautiful dish in the photos was a birthday present from my sister last Christmas (my birthday is just a few days afterward X-mas day). Thank you, Smyles!

Happy Eating!

Carrot and Sultana Spiced Rice

  • 1 cup of basmati rice, soaked for a minimum of 30 minutes, and then rinsed.*
  • 3 tbsp coconut oil or vegetable oil, divided
  • 1 bay leaf
  • 4-6 cardamom pods, put a small slit in each one
  • 6 crushed garlic cloves
  • 1 cinnamon stick
  • 1 onion, died
  • 1 carrot, grated
  • 1 cup of sultanas
  • 1.75 cups of cold water or cooled down vegetable stock, either way it should just barely cover the rice and vegetables.
  • 1 cup of frozen peas (optional)
  • butter 2-3 tbsp
  • 2-3 onions, sliced
  • salt, pepper
  • 1 cup flaked almonds
  • coriander
  • salt
  • pepper
  1. After soaking the rice for a minimum of 30 minutes, drain and rinse the rice. Set aside.
  2. Heat a pot on medium heat and once hot, add the oil and heat for 30 seconds.
  3. Then add the bay leaf, cardamom pods, garlic and cinnamon to release the aromatic flavours. Heat for 1 minute to allow them to become fragrant.
  4. Add the onion, carrot and sultanas and cook for 5-10 minutes until the onions are softened. Add salt and pepper to taste.
  5. Stir in the rice and cook for 5 minutes, stirring occasionally.
  6. Add the water or stock, stir scraping the bottom to get any of those cooked on spices and increase heat to high and bring to the boil.
  7. Cover with a lid and reduce to low. Cook for 10 minutes or until the water is absorbed, which shouldn’t be more than another minute or two.
  8. Once the rice is cooked, add butter and the frozen peas, if using. Put the lid back on and leave to rest for 5 minutes.
  9. Then stir the peas and butter in with a fork. Season with salt and pepper
  10. Meanwhile, heat a frying pan on medium heat, add the 2 tbsp of coconut oil. I recommend doing this when you add the rice in Step 5.
  11. Heat for 30 seconds and then add the onions, and fry, stirring frequently, until they are golden brown, 10 to 15 minutes. Season to taste, and then set aside until serving.
  12. While the rice is resting (step 8), using a broiler or a grill, toast your almonds.
  13. Stir in the onions and place in your serving dish. Then sprinkle on the almonds and fresh coriander and serve. Delicious with Oven Roasted Yogurt Chicken and Vegetable Curry and Stir-fried Lentils and Vegetables.

Tips

*If you can, soak your rice for longer. If I know I’m making rice for dinner, I put the rice plus 2-3 cups of water to soak for the whole day (6a.m to 4.pm) while I’m at work. I then drain it, rinse it and leave it soak for another 30 before draining and re-rinsing. Otherwise I do the 30 minutes suggested above.

To make into more of a meal, add paneer to your onions when you are frying them. Add when the onions are softened and cook until the paneer is browned on two sides.

Alternatively, cook your favourite meat dry-rubbed with a 1/4tsp cumin, salt and pepper per piece and serve alongside the rice. I love duck. Along with lamb, it’s my luxury meat when I want a treat that isn’t crisps or chocolate. It feel luscious and decadent to eat and the smell is so tantalising. For duck, I’ve been following the method suggested by Woks of Life for their Easy Peking Duck recipe for years and it’s amazing.

That chili sea salt that I’ve mentioned before is also really tasty sprinkled on top.

Asparagus, Courgette and Sausage Pasta

Let there be seasons so that our tongues will be rich in asparagus and limes. 

– Anne Sexton

JUMP TO RECIPE

Happy Summer to you all.

I have actually gone away on holidays – and it wasn’t for a wedding! That’s a miracle in and of itself as in last 6 years nearly every holiday I had taken was connected to a wedding of a dear friend or relative. In fact, when I went away last September, it was for my sister’s wedding. This time though, it wasn’t a trip abroad but a trip about an hour’s drive outside of Dublin to a town called Kells. It’s near a lot of important Irish cultural and religious sites including The Hills of Tara and Slane. We went to Tara, the Spire of Lloyd and a lake in nearby Cavan. We were about 5 minutes from a Holy Well which I think I went to about 3 times in the one week! The children liked to go and climb the hill and drink the waters. We stayed in two adorable cottages outside of Kells (we were 14 people – I am from a large family) and spent the few days lazing in the garden, eating tons of food and playing some board games. Additionally, we had a movie night with the classic The Princess Bride. It was so lovely to do something so “normal” after the nightmare the last year has been.

Anway, enough about my holiday! On to the recipe and how it came about. I don’t know which chefs you like to follow or if you are at all familiar with Jamie Oliver. He’s quite popular over here in Ireland. A couple of years ago, he did a tour of Italy and spent time with the Italian Nonnas cooking and learning from them. Gennaro Contaldo was another chef who joined him. Gennaro is Italian and is Jamie Oliver’s mentor. He’s also completely charming. Well, at least I think he is based on what I’ve seen of him as I haven’t actually ever met him, nor have I watched any of his shows, but I do follow him on Instagram and he is so full of joie de vivre. I love watching his little tutorials and reading his comments. He brings me joy on sad, grey days.

Anyway, a few weeks ago he posted a recipe with asparagus and courgette as they were in season. It looked delicious and I went out and bought both ingredients. I forgot to buy the tomatoes and I had some sausages on hand that needed to be used up so I improvised and came up with the following dish. It’s definitely inspired by Gennaro Contaldo’s seasonal dish but the end result is quite different. I guess you could say it is a fusion of Italian and Irish food as sausages are a very Irish thing to eat.

I hope you enjoy it, and that you take some time to soak up Gennaro’s jolly outlook on life and cooking. You won’t regret it.

Top photo is how the sausage should look when ypou throw in the rest of the ingredients. The bottom photo is after cooking off the first portion of the pasta water. As you can see, the vegetables have reduced considerably in size.

Asparagus, Courgette and Sausage Pasta

Serves 2-4*

Ingredients

  • 1 small courgette, quartered and chopped into chunks
  • 1 bunch, around 250g, of asparagus, trimmed and then sliced into thirds
  • 4-6 shallots, slice lengthwise into 3rds or 4ths and then slice horizontally the same number of times.
  • 4 pork sausages, cut into 4ths, 115g approximately. I used Clonakilty Ispíní (Ispíní is the Irish word for sausage)**
  • Marinade:
    • 2 cloves of garlic, minced or crushed***
    • 1/2 tsp of dried basil
    • 2 tbsp lemon juice, fresh if you have it
    • 1 tbsp balsamic vinegar
    • 1 tbsp olive oil
    • fine sea salt
    • freshly ground black pepper
  • 1/2 tbsp olive oil
  • 1 cup of pasta water
  • Pasta, 250g. I used Voiella La Mezza Manica Rigata cooking time was 13 minutes, according to the package directions, but you only need to cook for 10-11. I like this pasta because it’s big enough for a piece of courgette or sausage to fit into the centre. Otherwise, use penne, which is what I used the first few times I made this.
    • 1-2 tbsp table salt
    • 2 tbsp lemon juice, divided, fresh if you have it
    • 3 tbsp green pesto
    • 30g Parmigiano-Reggiano, freshly grated
    • 2 tbsp toasted pine nuts, optional
    • fresh basil – 4 or so leaves per bowl, optional. You can leave them whole or chop them. If you don’t have fresh basil, use 1/2 tsp of dried basil and just stir into the pesto.

Method

  1. Put the courgette, asparagus, shallots and sausage into a bowl and stir gently to mix.
  2. Add the ingredients for the marinade and stir gently to combine. Cover with clingfilm and leave on the counter, for 30 minutes.
  3. At the end of 30 minutes, put an inch or two of water into a big pot to come to the boil. At the same time boil an electric kettle full of water.
  4. At the same time as you are putting the water on to boil, put a large frying pan on medium-high heat (my cooker has a 1-6 setting, so I’m using number 4). Once hot, add half a tbsp of olive oil to heat.
  5. After 30 seconds of heating the oil, add the sasuages to the frying pan. There should be 16 pieces frying in the oil. Turn frequently until they start to gently brown on most sides. Some of the other ingredients, like the garlic or shallot which were stuck to the sausage, might start to stick to the bottom of your pan. Scrape them off the bottom but don’t worry too much as when you add the remaining marinating ingredients, they will de-glaze.
  6. Once the water in the kettle has boiled, add it to the pot along with the 1-2 tbsp of salt. If needed, boil another kettle full until the water in the pot is about an inch from the surface. Add a tbsp of lemon juice and keep bringing to the boil (at least another 20-30 minutes for my pot which is huge).
  7. After 8-10 minutes, add the shallots, asparagus, courgette and marinade on top of the sausages and let it cook for 1-2 minutes without stirring. Then stir everything in together, being sure to scrape the bottom of the pan as the marinade will de-glaze any garlic or shallots that were browning while the sasuages were cooking.
  8. Keep cooking and stirring occassionally, making sure that the sausages are always touching the bottom of the pan so that they brown. After about another 10 or sominutes, the marinade will have boiled off and the garlic and shallots will stick to the bottom of the pan again. Scrape them off and keep doing this for the moment, as needed.
  9. Meanwhile, when the water and lemon juice are boiling, add the pasta and stir. Once it comes back to the boil, boil for 5 minutes and then dip a mug into the pasta water and add a little, about a 1/4 cup, to the frying pan. Make sure no pieces of pasta went into the mug. If they have, spoon them out and put back in the pot.
  10. Using the pasta water, de-glaze the frying pan. When that pasta water has mostly cooked off and the ingredients are, again, sticking to the pan, add some more of the pasta water, another 1/4 cup, and de-glaze. You should only need to do this twice with the pasta water.
  11. Meanwhile, after another 5 minutes of boiling the pasta (10-11 altogether), drain it well and tip back into the pot it had been cooking in.
  12. Add the pesto and 1 tbsp of lemon juice to the pasta and stir until well-combined.
  13. Add the cheese and pine nuts to the pasta and combine well. Set the pot aside until you need it.
  14. Once the sausages are mostly browned all over, and the courgette has shrunk a bit and browned a little, remove from the heat and stir through the pasta.
  15. Divide into 4 bowls and serve with fresh basil on top.

Tips:

*Most of the time, I divide it into 4 portions, so I have some for the next day’s meals. However, when I’ve been really hungry, I have easily eaten half in one go. But then, maybe you aren’t a pasta fiend!

**If you wanted to make this for more people, you could add 2 sausages per person rather than just four. You could also double the vegetables and the marinade.

***Normally, I’d add more garlic but I wanted the basil and lemon to shine.

Self-Dressing Cottage Cheese Salad

To remember a successful salad is generally to remember a successful dinner; at all events, the perfect dinner necessarily includes the perfect salad.

George Ellwanger

Jump to recipe

While I don’t think Mr. Ellwanger is wrong when he refers to salad as being part of the perfect dinner, I think that is only true when you have a 3+ course meal. In fact, I’m a huge fan of just salad for dinner, or better yet, lunch.

This recipe is one I’ve been making for a couple of years, ever since I did the Blood Sugar Diet a couple of years ago. A few small changes over the years has refined this self-dressing salad which has become one of my go-to lunches especially on Fridays when I generally don’t eat meat. So, if you are a fellow Friday-Faster or a Meatless-Monday doer, you may want to add this to your repertoire. In fact, I’d often make it in the morning, minus the cottage cheese and avocado, and put it in the fridge at work until my lunch time. Easy peasy. What I like even more is that most of it can be prepared ahead of time, up to 24 hours in advance.

Thanks to the avocado and the cottage cheese, there are quite a few calories but they are essential for the creaminess and for the “self-dressing” part of this salad. The carrot, radish and peppper provide the crunch. Scallions, radish, garlic, the bite. The beetroot gives it a bit of earthiness. So, lots of different textures and flavours for your tastebuds to enjoy. A few things that I love about this salad, besides the tetures and flavours, is that most of it is fresh ingredients. The only three things “from a jar” are the olives, cottage cheese and the chilli sea salt. Everything else is a fresh vegetable or herb. Also, it’s really filling. I only ever eat this salad by itself and I never have bread with it. The Chilli Hit Sea Salt was a gift from my sister, K, and this lovely bowl from my sister, Smyles. Thanks, girls.

I wanted to give a shoutout to Amanda Biddle at Striped Spatula for her very easy to follow “jump to recipe” how-to-tutorial. Thank you! When I can I’ll go back through recipes and create this “jump” on all of them.

Self-Dressing Cottage Cheese Salad

Serves 1

Ingredients

  • 6-8 cherry, baby plum or sunstream tomatoes, halved or quartered depending on the size
  • 1 cooked beetroot, chopped
  • 13 pitted black olives, sliced into thirds
  • 1-2 garlic cloves, minced or crushed
  • 1 sprig of fresh parsley, washed and chopped
  • 1 sprig of fresh coriander, washed and chopped
  • freshly ground black pepper to taste
  • 1/8 to 1/4 tsp Cornish Sea Salt Co. Chilli Hit OR 1/8 tsp of chilli flakes and 1/8 tsp freshly ground sea salt, depending on your own preference.
  • 1/2 large carrot, peeled and sliced
  • 4 red radishes, topped and tailed, then sliced.
  • 1/4 cucumber, chopped
  • 3 scallions, chopped
  • 1/2 red, yellow or orange capiscum pepper, deseeded and chopped
  • 1/4 avocado, chopped
  • 150g Milbona Cottage Cheese (or one that is more curds than whey)
  • 50g smoked salmon sliced Or a hard-boiled egg, chopped (optional)

Method

  1. In a tupperware container (or an old Carte D’or ice-cream tub) put the tomatoes, beetroot, black olives, garlic, herbs, pepper and chili sea salt*. Mix together and set aside.
  2. At this stage, I then prepare rest of the ingredients, as above, from the carrot to the scallions.
  3. Put them into a colander and wash. Add them to the tupperware container a tablespoon or two at a time and mix well.
  4. Put the lid on and refrigerate for a minimum of three hours, or overnight. **
  5. When you are ready to serve chop your avocado and mix it in, then add the cottage cheese. If using either the salmon or egg, add at this stage as well. Mix together and dig in.

Tips

*If you want, as you can see in one of the photos above, you can add the chilli at the end with the cottage cheese. I prefer adding it as in step 1 but I do like to change it up every now and then.

**As mentioned, I used to make this for work. I would prepare this salad, steps 1-4, around 7am. When I got into work at 8/8.30am, I’d pop it into the fridge until lunchtime, which for me was 11a.m. ESL teacher life. And office life. Ah, those were the days!

If you don’t like refrigerated tomatoes, you can add them at the same time as the avocado and cream cheese.

Creamy Vegan Lemon-Tahini Mushroom Ramen

“Who the hell was this guy, barging in to deny me my ramen?”

-Wataru Watari

When I was doing my vegan month, back in November, I reached out to some friends who were vegan, or who had been vegan in the past, to get some recommendations. My biggest cheerleader, supporter and encourager was my baby sister. Not only did she give me lots of advice for surviving the month, she also gave me some recipes or referred me to several blogs that had helpful, delicious and quick but healthy meals.

One of these was Budget Bytes, and I instantly fell in love with a couple of her recipes, including this Creamy Coconut Lentil Curry and, as you can probably guess, her Vegan Creamy Mushroom Ramen. In fact, I’ve made both of them several times since that month and both are so good that I would definitely recommend them and you should try them in their original form.

Once, I’d made the Mushroom Ramen once or twice, I started adding different spices to it and over the course of the next few months, while I’ve kept her method, I have added to her ingredients. I kept envisioning a lemon and sesame flavoured creamy mushroom ramen and after several attempts, which I abandoned with lemongrass, I came up with the recipe below. Almost from the beginning, I began adding garlic, ginger and chiliflakes which are natural pairings for me with any Asian dish but the turmeric is my sister’s ingenious idea and I totally stole it from her (thanks, babes!). Like I said, getting the lemon-sesame combination took a little bit of time but eventually (in fact just in the last week) I came up with a broth that I just love and I am sure that you will, too.

Some health benefits include:

  • pak choi can decrease the risk of cancer
  • mushrooms are cholestrol free
  • spinach is good for your iron levels
  • ginger can reduce damage to your arteries.

Creamy Vegan Lemon-Tahini Mushroom Ramen

Adapted from Budget Bytes

Serves 1

Ingredients

  • 2 tbsp tahini, if your tahini has separated be sure to stir it back together before getting the tbsp’s for this recipe
  • 4 tbsp lemon juice
  • 1/ 1/4 tsp of sesame oil
  • 325ml boiling water, more if needed
  • 1 vegetable bouillon cube such as Oxo or Knorr.
  • 1/2 tbsp sunflower or vegetable oil*
  • 3 cloves of garlic, finely minced or crushed
  • 1 tbsp grated ginger, including any juices from the ginger
  • 1/4  1/2 tsp of chiliflakes (I use the  1/2, but if you prefer less spice I’d go with the smaller amount)
  • 1/4 tsp turmeric powder
  • 115g of sliced chestnut mushrooms**
  • Fine sea salt and freshly ground black pepper to season
  • 1 bulb of Shanghai pak choi/bok choy, washed and bottom part of bulb discarded
  • 1 package of Instant Ramen Noodles, I use either Koka or the Hearty Food Co. ones from Tesco. You only need the noodles so you can discard the seasoning package
  • 1/2 cup spinach, washed
  • 1/2 cup full-fat coconut milk, I use either Chaokoh or Thai Gold Organic
  • 1 bunch basil leaves, washed and stems removed***
  • 1 green onion/scallion, sliced thinly on the diagonal
  • sesame oil, for drizzling

Method

  1. Pre-heat a small pot on medium heat. My stove goes from 1-6, so I put it on 3.
  2. Put the lemon juice and tahini in a small glass or cup and whisk together. I used a spoon to stir first and then I whisked with a small whisk to get rid of as many lumps as I could.
  3. Add the sesame oil and whisk again. Don’t worry if it is still a bit lumpy as the broth will help to smoothen it out.
  4. Crush your bouillon cube into a jug, I use a spoon to prevent the glass from cracking, and stir the broth.
  5. Then add a little broth to the lemon-tahini mixture, again using a spoon to prevent cracking, and whisk until smooth. Set aside for a minute.
  6. To the pot, add the vegetable oil and heat for a couple of seconds. Then, add the mushrooms, garlic, ginger, chiliflakes and turmeric and stir with a wooden spoon. The oil will be sopped up by the mushrooms and the pot will look very dry. Don’t worry, this is supposed to happen. Now add the salt and pepper
  7. Stirring occasionally, for the next 10 or so minutes, let the mushrooms and spices cook. Over the next 10 or so minutes the mushrooms will release moisture back to the pot. You want to continue cooking them until the pot dries up again. If any of the spices seem to be sticking to the bottom of the pot, that’s okay as they will be released when you add the broth. (see image above)
  8. In the meantime, stir your small cup of lemon-tahini broth back into the bigger jug. It will look kind of creamy in colour. You need 400ml of broth all together, so if you need to, add a little more boiling water.
  9. Once the mushrooms are ready, as in the bottom of the pot looks dry again, add the broth and bring to the boil by turning up the heat to 5.
  10. Once boiling add the pak choi, making sure the thicker ends are completely submerged in the broth. Then, add the noodles pushing them down into the broth and let the pak choi and the noodles boil in the broth for 3 minutes. I recommend setting a timer.
  11. Turn off the heat but leave the pot on the same ring. Stir in the spinach and once it wilts, remove the pot from the heat.
  12. Add the coconut milk, stirring to combine.
  13. Put everything in a big bowl, add the basil to the middle and then top with the scallion and drizzle a little sesame oil on top. Alternatively, put the scallion in the middle, drizzle over the sesame oil and place the basil in a circle around the onions.
  14. Grab a spoon and some chopsticks and dig in.

Tips

*Don’t use olive oil in Asian cooking. It affects the flavour and really doesn’t work here. Sunflower or vegetable oil are more neutral.

**The original recipe called for baby bella mushrooms. I never found these here in Ireland in any of the local grocery shops. They may be available in some speciality shops. I have used one large portobella mushrooms with a few chestnut mushrooms. I sliced it to the same width as the chesnut mushrooms and then cut into threes so that they were same size the others. Both versions tasted great. I don’t have a mushroom brush, so I use a damp papertowel to clean the dirt off.

***In my local grocery shop I couldn’t find Thai basil and I haven’t made it to the Asian market in a while. I just used the normal basil. If you can find Thai basil, let me know what you think as I think it would definitely bring this up a notch.

Smyles’ 5 Ingredient Tomato Soup

“I’m the first to admit I’m not much of a cook. But since soup mainly involves tossing everything in a pot and waiting, it’s one of my better dishes.”

~ Suzanne Collins ~

There is something about cold, wintery, blustery days that just calls for soup. We have had plenty of them in the last few weeks and soup is indeed my comfort food of choice at the moment.

This soup is one of my sister’s. I don’t really deviate in any way from her recipe, until it comes to the toppings. When I did my vegan month, back in November, she suggested this as something that could work quite well during it. And, boy, was she right! In fact, I’d get up early once a week, and make the soup (minus the blending) before I went on my morning walk. At that time, like now, we were in the middle of a national lockdown (and just in case you are reading this in 100 years, it was Covid-19 times!), and I was working from home, teaching ESL. Except for one week, I had this soup at least 3 days every week of vegan month.

Since then, I’ve made it loads – especially when we went back into lockdown in January and the days felt even colder than they did in November. It’s thick and filling with simple ingredients. There are only 5, besides the fat, seasonings as well as the toppings, which are optional. The main thing about this soup that makes it different is the method.

For toppings, my sister usually uses basil, as do I, but I also use almonds. I mostly eat this without any carbs but, occasionally, I eat it with a toasted bagel, grilled cheese, a Tuna Burger , croutons or quesadillas for a difference – especially if I have it in the evening. So, feel free to make it your own.

Smyles’ 5 Ingredient Tomato Soup

Ingredients

  • 1 largish carrot, sliced
  • 1 medium white/yellow onion, chopped
  • 1- 2 garlic cloves, peeled but whole*
  • 1 tbsp butter or olive oil
  • Sea salt and freshly groud pepper to season
  • 500g passata
  • 500ml vegetable or chicken stock*.

Toppings

  • 1 piece basil per bowl
  • 1 tbsp flaked almonds per bowl, toasted
  • 3-4 croutons per bowl=
Method Steps 1+3

Method

  1. Get a piece of tin foil larger than the bottom of the pot you are going to use. Crinkle it into a circle the size of the bottom of your pot..
  2. Put the pot on low heat, 2 maximum, and add the carrot, onion, garlic, butter/oil, salt and pepper.
  3. Cover with the vegetables with the foil, non-shiny side down, pushed down onto the vegetables and make sure no veggies are peaking out (see photo above). This is so that you seal the vegetables in, ensuring they retain their flavour and don’t brown.
  4. Leave for 25-30 minutes. I check the veg and stir it at 20 min to ensure the fat is still covering everything and, then, put the foil back on for another 5 -10 min. It’s very forgiving so if you forget it for a little longer, it’s fine.
  5. At 30 min, or when the vegetables are nice and tender, remove the foil, stir in the passata and stock, increase the tempeature to to 4 (medium high) and bring to the boil.
  6. Cover with a lid, reduce heat and cook for about 30 min.
  7. Once cooked, if using immediately, blend using an immersion blender. If some of your carrots don’t seem to be blending, transfer to a narrower pot.
  8. Just before blending, turn your grill/broiler on, and toast your almonds whilst blending, if using. I don’t add any seasoning at this point but you are more than welcome to.
  9. If not using immediately, you can still blend now or set aside to blend when eating. I’d also wait to make the almonds at that point as well.
  10. Top with basil, almonds and/or croutons and enjoy.

Notes

Garlic I want the tomato to shine, so I usually use about 2 cloves. However, if you want it to be more garlicky, please feel free to add more.

Stock – I usually use a cube of vegetable stock and my sister uses homemade chicken stock. Recently, I made a batch with half vegetable cube and half black bean stock I had leftover and it was a game changer.

New Year’s Eve Sausage Rolls

I do adore food. If I have any vice it’s eating. If I was told I could only eat one food for the rest of my life, I could put up with sausage and mash forever.

~ Colin Baker, The 6th Doctor

New Year’s Eve. Either you love it or you hate it. I think I fall into the camp of “hate it”. I’m not sure why but I don’t particularly like it and I’ve never really gotten the whole “party” atmosphere of the holiday.

That being said, I do have some treasured memories related to the holiday as a child – going outside with the neighbours and banging pots and pans, hearing the fog horns, being beeped by all the taxis and the excitement of movie nights and that illicit feeling you have as a child staying up way past your bedtime and eating lots of fun food. In my family, we have some weird traditions. One is having an egg flip – my dad would line up the glasses with whisked egg and pour on the milk, and every New Year’s Eve, we’d be the first people in Ireland (according to him) to have sausages, grilled, wrapped in bread with brown sauce. Over the years, we’ve graduated from banging pots to going to reflection nights in our local parish, some people going to the pub or a neighbours for a wee party and to replacing the egg flips with Bailey’s or Five Farms and sausages with sausage rolls.

2020 has been a dramatic year to say the least and we all know what the negatives have been. However, there have been positives and I really believe if we concentrate on those it will put us in a happier frame of mind and can help us to find the light in the darkness. Some of the highlights of my year include my new nephew, my sister falling in love and getting married during the pandemic, my new brother-in-law, finding a healthier balance in my life in terms of my food obsession and exercise. I have been incorporating a combination of intermittent fasting with lots of walking and trying (and sometimes failing spectacularly) to make healthier choices everyday. Spending more time with loved ones in person, and via zoom, has become even more important. For me as well, I’ve been on a faith journey that was challenged by the pandemic but not destroyed by it.

Obviously with Covid, many of the parties people would have gone to will possibly be cancelled or, at the very least, much smaller than they would have been. That doesn’t mean that we shouldn’t ring in 2021 or say goodbye to what has been a very trying year. In fact, even I want to celebrate and I intend to with these rather tasty sausage rolls!

Firstly, buy good quality pork or turkey sausages. I used Superquinn sausages, which are topnotch. If you don’t have access to Superquinn sausages (available at Supervalu), please buy from a butcher. Buy unseasoned sausages as you are going to add your own seasoning as per the below. Also, I recommend sausages in casing as it is so satisfying and so much fun pushing the meat out of the casing into the bowl. This would also make it a good activity for young children to be involved in as well as an excellent opportunity in teaching food safety and cleanliness. However, it is a bit “adult” in taste, so younger kids may not enjoy it. My nieces and nephews preferred basic sausages rolls – pork, seasoning and pastry, whereas some friends who were just a little older really liked these.

New Year’s Eve Sausage Rolls

Ingredients

  • 1 sheet of puff pastry
  • Superquinn pork sausages (4) or 165g pork sausages in casing OR turkey sausages
  • a large Pink Lady apple (cut in half, and about 3/4 of that half)
  • Vintage or mature cheddar cheese, about a small matchbox in size – you can use a little more or less depending on your own preferences
  • 2-3 tsp red onion chutney/caramelised red onion marmalade
  • 1/4 1/2 tsp dried sage, plus extra for sprinkling
  • milk/butter/whisked egg
  • salt, freshly ground or sea salt
  • pepper, freshly ground

Method

  1. Put the oven at 220°C
  2. Take the puff pastry out of the fridge and it’s box and set aside for around 10 minutes. If you are making a few batches, I’d recommend leaving your pastry for your second batch in the fridge until you are ready so that it doesn’t get sticky.
  3. Prepare a baking sheet with some greaseproof paper/parchment paper or, even better, use reusable baking paper paper.
  4. Grate the cheese and the apple into a bowl and mix together.
  5. Cut the sausage at one end and push the meat through the skin into the bowl.
  6. Add the chutney, sage and some seasoning and using a fork, mixing well. If it’s not gelling well for you, just add a little more of the chutney or cheese.
  7. Set the bowl aside, roll out the pastry and cut down the middle, vertically.
  8. On each piece of pastry, a little off centre, divide the sausage mixture in a the shape of sausage.
  9. Season again with the sage, salt and pepper. If you forget this stage, it’s okay for the pork but the turkey really needs it.
  10. Fold the thinner side of the pastry over the filling, brush/spoon a little milk/butter/egg over the pastry and then fold over the other side, covering the filling completely and the seam is at the edge.
  11. Brush/spoon milk/butter/egg over the pastry and then cut each large piece into 4 smaller pieces and then stab your knife into into the top of each piece and, then, pop in the oven for approximately 18-20 minutes until golden.
  12. Remove from the oven and using a fish slice remove the sausage rolls from the baking sheet and put on a cooling rack/wire rack until ready serve and/or they are cool enough to eat.
  13. Enjoy by themselves or with some ketchup or Ballymaloe relish.

Notes

I’ve tested the recipe several times with friends and family and both the pork and turkey were delicious.

If, for some reason you’ve forgotten an egg or don’t have time to melt butter, just use some milk. I currently don’t own a pastry brush so I just use a spoon, drizzle some milk onto the pastry and then I use the back of the spoon to spread it.

Savoury Sweet Potato Mash

I’m baaaacckkkk! It’s only been a few years!

Just a quick explanation of why I left and why I’m suddenly back. I stopped doing this blog as I felt pressured, from myself, to have something to publish every week and my life wasn’t in a place where I could do that and I felt guilty. To be honest, my life still isn’t in a place where I can do a weekly post but I’m actually okay with that now. I have loved writing this blog, creating recipes and sharing ones that I love and, so, I missed it over the last 3 plus years. The reason I do this blog is because I love cooking and I want to share what I love with the small corner of the internet which wants to see what I cook and because I met a lovely community that I missed connecting with (“hi, again” to Jhuls @ The Not So Creative Cook, Elaine @ Foodbod Sourdough, Gretchen @ Feeding My Three Sons and Angie @ Fiesta Friday). You can read more about this and me here.

So, here I am, for better or worse. Well, life has changed a lot since my last post in April 2017. I am now renting an apartment on the other side of the city which I share with a lovely Italian girl and a lovely Polish girl. I have two more nephews who are just as adorable as the rest of their siblings. I’ve travelled a lot for weddings – I’ve been to Italy, France, Germany, Poland and the USA – in fact, I even have a new brother-in-law. I’ve travelled to Tanzania to visit my sister and her family who were living there for a little over half a year, back in 2019, and I went on safari. So, I hope you enjoy this recipe, this post and reconnecting after a very long time.

Onwards and upwards!

I love sweet potato but it’s not one of the most popular vegetables in my family. A few years ago my mother and sister did a sweet potato diet and after less then two days they were sick of it! However, they do still love the brown sugar, buttery, marshmallow sweet potato that we traditionally have over Thanksgiving. Thank goodness!

This dish was the result of a happy accident a couple of years ago. I had sweet potato and as I was mashing it, I decided to throw in some cheese and as the Cashel Blue was needing to be finished, that was the one I went with. My aunt makes these wonderful potatoes with raw garlic and so, thinking of that, I threw some in as well. A few more tweaks and this was born! It goes really well with any meat and I, personally, love it with baked salmon or pan-fried duck breast.

I really hope, though , you will maybe try this at your Thanksgiving celebration. And on that note, Happy Thanksgiving to you all.

Savoury Sweet Potato Mash

Ingredients

  • 1 large sweet potato
  • 1 tsp salted butter
  • small matchbox size, maximum, of blue cheese (I use Cashel Blue)
  • small matchbox size, maximum, of feta
  • 1 garlic clove (you will use it raw)
  • 1 small bunch parsley
  • 1 small bunch coriander
  • sea salt and black pepper, freshly ground

Method

  1. Chop your sweet potato into small pieces, I usually do about bitesize, but it doesn’t really matter as you will just be mashing it.
  2. Rinse and then place in a pot of water that just covers the sweet potato. Bring to the boil and continue to boil until tender. The length of time will depend on how big you cut your potato – I find it takes about 15-20 minutes.
  3. Meanwhile, mince your garlic, parsley and coriander and set aside. Keep the garlic separate from the herbs, though.
  4. Dice your cheeses and set aside.
  5. Once the sweet potato has boiled, drain and mash with the butter, salt and pepper.
  6. Then, using a fork stir in the raw garlic, feta and blue cheese.
  7. Finally, add the herbs.
  8. Serve and enjoy!